Saturday, February 20, 2016

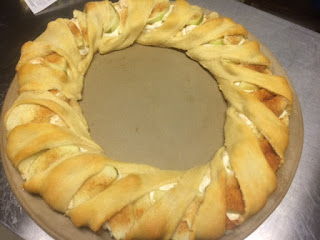
Caramel Apple Wreath

As a kid, my mom was really into Pampered Chef. You know, the company which produces amazing kitchen gadgets, which despite their stupidly exuberant price, you just can't live with out. I have many memories of some of the amazing concoctions she would make, everything from homemade pizza on their pizza ring, to pies which just tasted better because of the $100 pie pan (I'm exaggerating, it probably wasn't a $100 pie pan). But I digress.

A few years back, I found a pizza stone from Food Network at Kohls. It sat nicely with my other pans until recently, when I remembered my mom making this Caramel Apple Ring.

Yes, this golden crescent crusted beauty is the apple ring from my childhood. It not only tastes amazing, it looks nice too. Individuals of all ages (who like apples, cream cheese, and pastry plus caramel sauce) will enjoy it. Guaranteed! 

The recipe is quite simple, so lets break it down: 
  • 2 tubes of crescent rolls (I got the low carb one)
  • 2 packages cream cheese (I got the fat free one)
  • 1/2 cup powder sugar
  • 1 tsp of vanilla 
  • cinnamon sugar mixture to sprinkle over the apples
  • 2 Granny Smith Apples (I got two medium, but one large and a small one would work), cored and sliced
  • Smucker's Sundae Toppings--Caramel for the drizzle


Begin by mixing your cream cheese, vanilla, and powdered sugar. Combine until smooth. Note, that you can adjust the amount of sugar--but you want some in there to sweeten the cream cheese a little. Set mixture aside. 

Peel, core, and slice your apples. If you're gonna take a while getting the next part done, you might put some lemon juice on them to keep them from browning. 

Next, open your tubes of the crescent rolls, and begin laying them out around your rings. The base of the triangle should be towards the middle of the ring, and the tip of it (skinniest part) can drape over the edge of the pizza ring for now. Once you have the ring made with your crescent rolls, put your cream cheese mixture on. Spread it evenly around the ring. 

Take your sliced apples, and layer them ontop of the cream cheese.


Sprinkle your cinnamon sugar on top of the apples.
Take the tips of your triangles, and fold them over the apples and cream cheese.  


I baked mine in a preheated 350 degree oven for 20-25 minutes, until golden brown. Take your caramel syrup and drizzle it over the top. Enjoy! 


Sunday, March 9, 2014

Chicken Pot Pie

The moment of excitement has finally come! Here is my mom's recipe for Chicken Pot pie.
4 red potatoes, washed and diced. 
1 bag of frozen vegetables 
2 chicken breasts
Chicken bouillon 
1/2 cup Half and Half 
1 stick of butter (I use unsalted, so I can control the salt) 
Flour (for roux) 
Half an Onion, chopped

1 Pie Crust (Find the link to the recipe in this post I cut the recipe in half)


Individual ramekins This recipe made about 6 Food Network ramekins, as shown in the photo. 


I begin with cooking my chicken. I boiled mine, as it is easy, and allowed me to prep my other items without worrying about the chicken burning, etc. Additionally, I used the broth as the base for my filling. I prepared my crust per the instructions. Incase you haven't figured it out, I LOVE this pie crust. It is perfect for savory or sweet dishes. You can find the recipe in my post, titled The Best Pie Crust Ever. 

However, if you prefer to walk a more culinary line, then feel free to saute or grill your chicken however you'd like. 

After my chicken was cooked, I removed it to cool, and put my bag of veggies into that same water, along with my potatoes, and let them cook at a medium heat. Meanwhile, I prepped my crust for my ramekins. 

I was feeling rather lazy, so I simply used a pint glass to get the bottoms of my chicken pot pie. I didn't bother bringing the crust all the way up to the edge, however, if you have the time and energy, go for it! 

I then began to saute my chopped onion in butter. I used quite a bit of butter, and I made a roux. I also added about half a cup of half and half to my veggies, as they bubbled away happily. I also added my chicken bouillon, about a teaspoon, and some rosemary and majorum (a pinch or two of both, this is totally optional). 
With my roux made, I added it slowly into my veggies. My first time around wasn't enough of a roux to get it the thickness I wanted, so I made another batch. This is where your judgement comes in. Someday I'll pay attention to my exact measurements when doing this. 

Finally, I had my oven preheated at 375 degrees. I added the chicken gravy-veggie-enhanced goodness to my ramekins, and topped them all with a top crust. Make  sure to vent your pot pies. 

I baked mine for about 40 minutes, until the crust was golden brown. 

As an alternative, you could make just one large chicken pot pie. I have done this as well. Just make the full pie crust (so you have a top and bottom), and use your regular sized pie pan. This is just as effective, though I personally feel the ramekins give you a sense of individualized pleasure.  


Monday, November 4, 2013

Sausage and Wild Rice Casserole

"Is that chinese food?" you might ask. No, that is my mom's sausage and wild rice casserole.

 Casseroles are not something you see on many menus anymore. I can understand it, but this is one that everyone will enjoy, unless you don't eat pork, or don't like the mixture of different items.

The sausage wild rice casserole recipe came from my mom. I'm not really sure how she came across it, so if you happen to be the owner of the recipe, please accept my sincerest thanks.

I remember when my mom would make this dish, and how much I loved it as a kid. The ingredients are simple, but the flavor combination is fantastic. This is one of the many dishes I had as a kid which starred a specific ingredient over and over: Cream of Mushroom Soup. Personally, I keep on average 2-3 cans on hand.

So, here is a recipe from my home to yours. I hope you enjoy it as much as I do!

Here are the ingredients:

1 package Uncle Ben's Original Wild Rice (I actually get the fast cook version. It tastes the same, and doesn't require 30 minutes to cook!)
1 pound sausage (I like spicier sausages, but then again, I like spice!)
1 can cream of mushroom soup
1/2 cup chopped onion (this ended up being about all of a small onion, then again, I like onion!)
1 cup fresh mushrooms, chopped
1/2 cup chicken broth
1/2 cup shredded cheese
1/4 cup chopped celery (about one long sprig)

Directions:

Preheat oven to 350 degrees. Grease a 2 qt. casserole dish. Cook the rice according to directions, and brown the sausage; drain the sausage. Combine the sausage and rice, along with the remaining ingredients. Bake in preheated oven for one (1) hour.

Sunday, October 20, 2013

Pumpkin Bread: Enjoying the Fall

Being a grad student, and one who has been a grad student for almost four years, is exhausting, draining and overall stressful. Cooking has been one of my ways of managing this stress, and I have covered a lot of wonderful meals along the way. 
But now that the leaves are falling, and the temperature is dropping, I find myself in the mood for sweet things. Today, the weather was dreary, and it was a perfect opportunity to do some baking. On the menu: Pumpkin Bread. 

Because I live alone, I decided it was more economical to make mini loaves instead of the traditional loaf. I followed the recipe I got from Allrecipes.com (my favorite recipe resource) and made just one alteration to it. 

The recipe called for chocolate chips, and I do like chocolate chips, but not everyone (such as my mom) does enjoy them. And because I also had the additional agenda of stashing some easy housewarming gifts for all of the amazing halloween parties I will be attending, I decided to make 3 of the 6 loaves without the chocolate chips. 

You can find the recipe for this tasty bread here.


Saturday, September 7, 2013

Return to the Kitchen: Greek Burgers


I've been away most of the summer, and I can't believe it's already September! I've had a couple culinary experiences of the summer, but wanted to share one of my more recent achievements. That would be my Greek burgers.

A few years back my sister gave me a spice packet which was of mediterranean spices. I used all of that packet, so I returned to my trusty google to find a recipe, and I did. Food.com had it, and you can find that recipe here.

So, now for my Greek burgers. The key to making these burgers is the spices, but in order to keep your burgers together, you need to have a binding agent, so they don't get too dried out. An egg does the trick.


What you'll need:

For the beef:
1 egg
1 lbs of lean beef
2 tablespoons of mediterranien spice (see recipe above)
Salt and Pepper to taste

For the burger:

Pita pockets
feta cheese (crumbled works fine)
Tzskiki


First, combine your meat and the egg and spices. I use my hands to do this, as it is pointless to dirty up another dish (and don't forget to wash your hands!). Next, take about a hand full of the meat and press it into your desired patty size. I made mine smaller so they would fit in the pita pockets. Turn on the heat to your grill, grill pan, etc. I got mine to about medium high and put some olive oil on it to keep it from scorching. Grill the patties until desired doneness (I stopped mine at about medium).
To assemble the burger, open your pita pocket (but not all the way! Cut about half way around, this will give you a nice pocket for your toppings), and put the tzatziki sauce in, then the feta. You want it distributed evenly. Then put your burger in. I let my burgers sit for a few minutes on a paper towel (the towel got the excess grease, but the burgers stayed nice and juicy). You can serve this meal with carrots, celery and peppers, as they go great with the tzatziki. I also have a side of hummus, which is a great alternative to the tzatziki. 

Friday, March 29, 2013

Chocolate Raspberry Cake

In my past posts you will find Mad Hungry's "Busy Day Chocolate Cake." Today, I spruced it up using Giada De Laurentiis's recipe, a Chocolate-Raspberry layered cake. Giada suggests using a boxed cake mix--I thought, well, I don't like boxed cakes. So, I combined Mad Hungry’s Busy Day Chocolate Cake, and followed Giada’s recipe, and it turned out fantastic!


I garnished the cake with chocolate curls and raspberries! 
This is going to be the BEST Anniversary dessert ever! 


Monday, March 18, 2013

Tuna Avocado Salad


Tonight I made a Tuna Avocado salad, with fresh squeezed lemon, a tablespoon of mayonnaise and a tablespoon of cream cheese. This meal was so tasty. The lemon really enhanced the tuna fish, and the marriage between the mayonnaise and the cream cheese. It was quick to make, and very satisfying--and would be a great small hour meal.

Ingredients:

1 lemon, zested and juiced
1 can of tuna
1 avocado
1 tbs mayonnaise
1tbs cream cheese
1 dash of cucumber seed
salt and pepper to taste.


First, cut your avocado in half, and remove the pit. Using a paring knife, remove the bottom half of the avocado's meat, and add to a bowl. Depending on your texture preference, slice or mash the meat in the small bowl. Add lemon juice, and mix.  Add the tuna, mayo, cream cheese and cucumber seed. For an optional bit of texture, add a tbs or so of sunflower seeds. Mix together, and put back into the avocado halves. Add some lemon zest, salt and pepper to taste, and of course, enjoy!